Configuring VLANs and DHCP for User Groups
In a network environment, it is sometimes necessary to segment different user groups to improve security and performance. VLANs (Virtual Local Area Networks) provide a way to do this by dividing a physical network into multiple logical networks. This allows different user groups to be isolated from each other and to have their own set of configurations, such as DHCP (Dynamic Host Configuration Protocol) settings.
In this tutorial, we will go through the steps of configuring VLANs and DHCP for different user groups.
Prerequisites
Before we begin, we assume that you have the following:
- A Linux machine with a network interface named tap_home that is connected to a physical network
- Root access to the Linux machine
- Basic knowledge of networking concepts, such as IP addresses and subnets
Creating VLANs
The first step is to create VLANs for each user group. We will create two VLANs, one for each user group, with IDs 100 and 200.
1 | ip link add link tap_home name tap_home.100 type vlan id 100 |
Setting VLAN IDs for User Groups
Next, we need to set the VLAN ID for each user group. This can be done using the vpmcmm command.
Installing dnsmasq
We will use dnsmasq to provide DHCP services for each VLAN. Dnsmasq is a lightweight DHCP and DNS server that is easy to configure.
Creating VLAN Configuration Files
For each VLAN, we will create a configuration file that specifies the DHCP settings, such as the DNS server, gateway, and IP address range. Here is an example configuration file for VLAN 100:
1 | #port=53100 |
Here is an example configuration file for VLAN 200:
1 | #port=53100 |
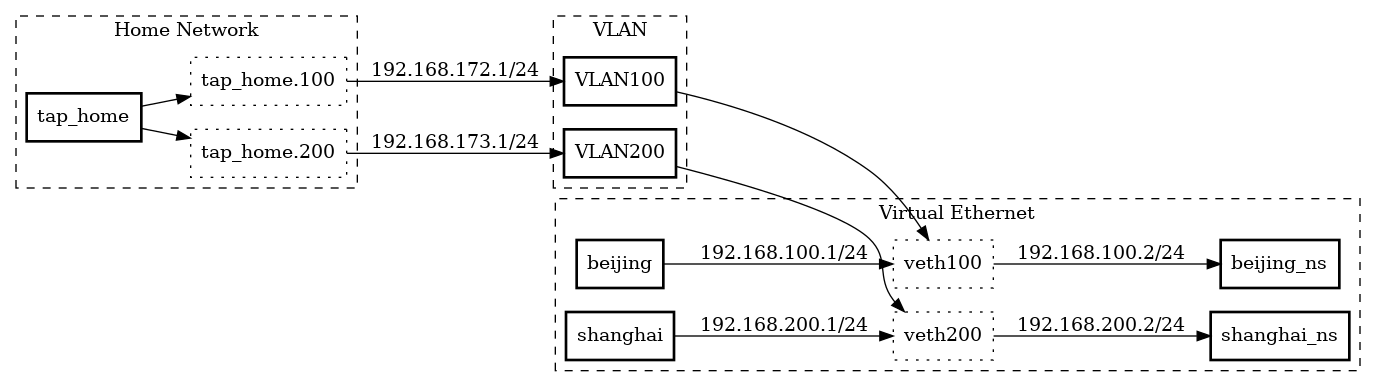
Next, we need to configure the IP addresses of the VLAN interfaces. We’ll assign 192.168.172.1/24 to tap_home.100 and 192.168.173.1/24 to tap_home.200:
1 | ip addr add 192.168.172.1/24 dev tap_home.100 |
Finally, we can bring up the network interfaces:
1 | ip link set tap_home up |
Now we’re ready to create the veth pairs that will be used to connect our namespaces. We’ll create two pairs, beijing/veth100 and shanghai/veth200:
1 | ip l a beijing type veth peer name veth100 |
We’ll assign IP addresses of 192.168.100.1/24 and 192.168.200.1/24 to beijing and shanghai, respectively:
1 | ip addr a 192.168.100.1/24 dev beijing |
Configuring VLANs and Network Namespaces for Network Isolation
Putting the other end of the eth pair into a netns and configuring its IP address:
1 | ip link set veth100 netns ns-beijing |
Setting the default route for the VLAN’s tap interface to go out via the other end of the eth pair:
1 | ip netns exec ns-beijing ip route add default via 192.168.100.1 |
Adding rules to use the correct routing tables for packets originating from each VLAN:
1 | ip rule add from 192.168.172.1/24 lookup 100 |
Configuring NAT for outbound traffic:
1 | iptables -t nat -A POSTROUTING -j MASQUERADE |
Setting up routing tables for each VLAN:
1 | ip route add 192.168.172.0/24 dev tap_home.100 proto kernel scope link src 192.168.172.1 table 100 |
Overall, this setup allows for traffic from each VLAN to be routed through its own dedicated netns, ensuring complete separation of network traffic. The use of VLANs also allows for multiple separate networks to exist on the same physical infrastructure, without the need for separate physical network segments.